Wednesday, 2 April 2014

WOYWW 252


Evening all fellow crafters, a short one tonight because it is late and I need my bed!

Another week has flown by although, workwise surely it should be Friday already! I haven't done much crafting this week due to deadlines for coursework at school.  Doesn't matter how long you give the students or how much notice you give them regarding deadlines, they all leave it to the very last minute .... arrggh ... very stressful.  Anyway had a good go at marking it at the weekend and set them lots of things to finish before we break up next week.  Fingers crossed it will be all done by then and they all get fantastic grades!

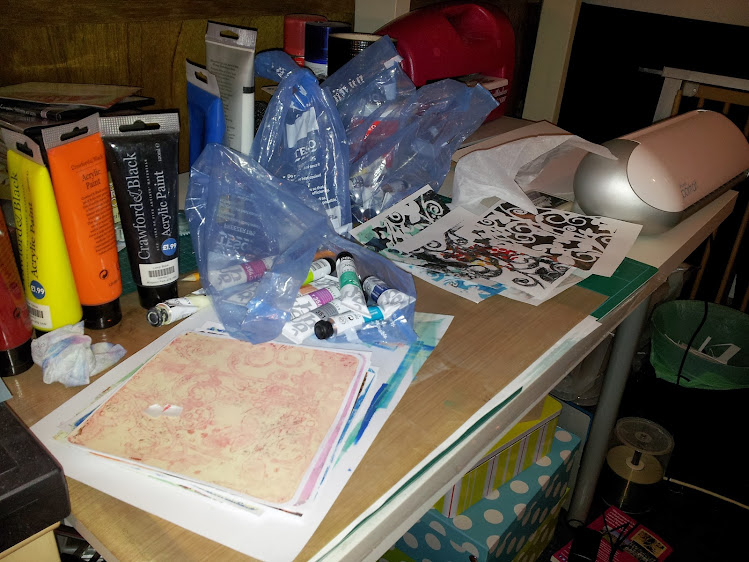
Anyway, this my desk this evening.  Bit of a mess again I'm afraid. 


There is a card I've been working on at the front.  Nearly finished but I keep getting interrupted. I'm trying to make it as an easel card.  You can see my first easel .... it's huge so I need to scale that down.  I'm embarrassed that there is still a jar of dirty water in the background.  I keep forgetting to take it downstairs with me to clean out. One of my box cards is still lurking at the back.  I must post it to my friend who had her baby in January.  I am terribly disorganised sometimes!


Here is another of box cards I made at the weekend.  Hope you all have a great week and thanks for popping by.  Please leave a comment.

Ela x

Wednesday, 26 March 2014

WOWYWW .... Popping up all over


Displaying 1395868183127.png
Hello fellow crafty people, another Wednesday and another WOYWW ... where does the time go.  I've missed the past couple of Wednesdays due to parent's evenings at school, but I was determined to have another go this week.

So today I've been playing on my silhouette portrait machine.  I love this device so much and since they have got a half price sale on files at the moment, I've been stocking up on some extra images.  My desk is relatively tidy but you should see the floor with all the bits of paper and other debris.  I really must hoover up here at the weekend!


Displaying 1395868148396.png

So this is what I have been working on today.  It is a Lori Whitlock design and a birthday card for my son's friend.  I have used Clarity letterbox kit to do the name. 

Here are some more designs I've done over the last couple of days. 


 I really love box pop up cards and I've a few more ideas up my sleeves for future designs.  
Enjoy the rest of your Wednesday and hopefully I'll see you next week.

Wednesday, 5 March 2014

WOYWW ... Gelli-plate-tastic


Good evening fellow crafters, I've decided to plunge into the world of  WOYWW having been fascinated by other people's desks for sometime!  On my desk this Wednesday evening is mostly the results of my recent (i.e. Sunday and Monday night first-time play with my gelli-plate and various stencils.)


Bags of paints and my trusty silhouette.  You can also see some of my paper prints I used as rough paper which are quite nice too and might keep in as part of my stash. You can't see my most important crafty companion .. my radio.  It fell off my desk because there is too much on it and it is now residing underneath.  Still works and I have Jo Whiley keeping me company this evening.

Now I have been putting off this experimentation since last summer, but it was no good, I had to give it a go.  And what did I think you may ask? ..  I LOVED IT!  
Gelli-plate-tastic!
This is just a small sample.  I currently don't have many stencils but I did improvise a bit, and made a couple of stencils myself out of card, using my Silhouette.


I love this one in particular.  You can't really see from the photo, but I used pebeo iridescent paint so it is all shimmery. 


So this evening I've been making backgrounds for a couple of tags I made a the weekend (see previous blog).  Hope you like them and thanks for stopping by. Thank you Julia for hosting this weekly event. x


Thursday, 27 February 2014

Taglines ....


Hello fellow crafty people, I hope you are having a good week.

Thought I would share with you a couple of tags I've been working on.  I've used a 3mm MDF shape I drew and lasered out, and did another of my tissue paper collage thingies.  I've always painted my MDF shapes but I am loving this technique and producing these backgrounds.  On this one I've used Claritystamp's lesson 19 classroom set - I think it was called Leafy Swirl and a Claritystamp verse which I embossed in black powder - another thing I'm really into!


I've used Claritystamp bird cage & flourishes set here.  I love this stamp set and  I really should use it more.


Next I need to make the cards to attach these too.  I'm going to break out my gelli plate which has been languishing a dark corner of the craft cave six months, but this weekend I am going to dust it off and finally have a go!  I shall report back with my efforts ... if they are any good of course.

Happy crafting! x


Saturday, 22 February 2014

Bearing all ...


Hello there crafty folk, 
What is this you may ask ... actually completing two blogs consecutively? Well it has been half-term this week so I have had a wee bit more time on my hands than usual.  This week I have got out my trusty sewing machine and I have made another bear for a friend who recently had a baby (I'm a bit late as it was over a month ago but I'm sure she won't mind as she is fellow teacher too!).  

Meet Blue Bear for baby Ely.  I used one of Mandy Shaw's super patterns from her Quilt Yourself Gorgeous book.  Her instructions are a bit quirky (as she puts it herself) but once you get your head around it they are simple to follow.

I use a blue fleece and various shades of blue felt that I had in my sewing stash.  I embroidered the eyes rather than her suggested buttons as I thought they would be safer for a baby and I am a bit of button phob (I know ridiculous but true!).


On the last one I made, I embroidered the leg with baby's name but on blue bear, I embroidered a tag (I always was a huge fan of Paddington Bear), which I attached to a blue ribbon.  I've sewn it in place so it is nice and secure.  Well that's all for today.  I do hope you like my bears,Happy Crafting! x

He's a jolly bear even if his ears are a bit big!
 
Below are some pictures of Pink Bear that I made for a little girl last summer.


Is it a mouse or a bear ... I really need to sort out those ears!

Friday, 21 February 2014

Clarity Stamp Challenge 12 .... Love & Romance


Photo

I decided that this month I would finally enter the Clarity Stamp Challenge and here is my entry.  The theme was Love and Romance and as my Clarity stash is quite limited still it was quite a challenge to come up with something!

I used an MDF heart I made on the laser cutter (I'm lucky enough to access one at school).  I then decoupaged it with white tissue paper and watered down PVA.  I overlayed this with pale pink and pink lace design tissue papers, with more white over some areas to tone the pink down. When doing this, you have to be careful not to get too much PVA onto the surface otherwise it will repel the ink. I used a paint brush end to poke through the hole while it was still wet. I dried this all off with a heat gun (mainly because I'm too impatient to wait for it dry naturally!).  I then blended some distress inks over the surface - I think I used warm lipstick and spiced marmalade, and butterscotch adirondack. When the tissue paper was completely dry, I sanded off all the edges around the heart.


Next, I used October's Clarity New Design Club Rose stamp (No 84).  Stamped it over the surface of the heart using versamark and embossed it in white.  (Remember to liberally apply talc over the surface first to remove any moisture that the embossing powder might cling to!).

Now for the tricky part.  Now from my experience, I am hopeless at stamping sentiments or verses accurately. They usually look if like I've been at the cooking sherry so when doing this one I had a moment of inspiration ... why not stamp onto white tissue paper and then carefully decoupage onto surface?!  It doesn't matter if it goes tragically wrong because I can just bin it.  I stamped the verse in versamark and then embossed it black embossing powder.  So far so good!  I then carefully tore round the edges so it looked nice and lay it down where I wanted it to go.  Then I carefully applied some watered down PVA to the surface.  Be really careful here not to press down too hard as it can wrinkle and tear.  I lost a bit of the 'r' in forever, but hey ho the rest of it was pretty good and because the white becomes translucent, you can hardly see the paper at all.


Now I am waffling on here, so I'd better get a move on. I stamped two each of the large and small Clarity Stamp Gerbera flowers onto Clarity theuva card using black archival and embossed them using black embossing powder.  I chose the gerbera flowers and coloured them in oranges because that is what I had in wedding bouquet ... see romantic! I inked the flowers using cut and dry foam in butterscotch and spiced marmalade.  I then used promarkers in reds, yellows and oranges to get the different tones.  I cut the outer petals off the two extra ones and glued them on top of the other ones using silicon glue.  I then glued them to the heart.


A little bit of peach ribbon to hang it up with and it is finished.  Hope you like it. It's a bit late to give to my husband for valentine's day but I'm sure he will love it anyway!

Have a great crafting week.
Ela x


Sunday, 9 February 2014

Fleather note-books

Hello again, another weekend nearly finished and I thought that today I would share my attempt at faux leather, inspired by Sheena Douglass.   


Displaying 20140209_202644.jpg

I used brown kraft card (available from Crafter's Companion) which I sprayed liberally with a mixture of glycerin (available from your chemist) and water until I was able scrunch the card up.  I did this a couple of times, each time massaging the glycerin mixture into the paper fibres.  I then embossed the card using my Grand Caliber and a Sheena Douglass embossing folder.  I can't remember what their particular names are but you can get them from Crafter's Companion too.  I love her embossing folders and I have been having a good experiment this week on all the different things you can create with them.

Anyway I digress.  Wait for the card to dry.  I hung them over a rack in craft room overnight (it's pretty cold up here so it would probably dry quicker if I bought them downstairs!).  Now the fun bit. Using distress inks and a blending tool, I distressed the card.  On the brown one, I used Ranger's vintage photo and adirondack's expresso.  The green one, I used adirondack pesto and lettuce (I'm note sure if this had any effect though as I started with pesto first) and finished off with a bit of vintage photo. You can use any colour you want.  I am going to experiment with reds and blacks next.

Now how to get that shiny leather look and to give your notebook a bit of durability. Spray some Crafter's Companion Spray and Shine.  Once you've sprayed it, rub it in a bit because you don't want it to be glossy shiny.

Ok, now you are ready to line your book with fabric.  


Choose a fabric that has a fairly small print. Cut your fabric so it is oversized.  Sheena suggested using a tacky glue.  I used Pinflair book binding glue which I applied in stages and used a credit card to smooth out any creases or air bubbles.  Then use a guillotine to trim.  As I haven't got one (my next crafty purchase I think?!), I used scissors but it wasn't ideal.  Another investment would be a corner cutter.  Mine are not very accurate but I was very excited to get on.  I should have marked them out first but went at it a bit gun ho!

On how to do the paper inserts, I suggest you have look at Sheena's YouTube tutorial.  She will explain it far better than me.  Here is a link - https://www.youtube.com/watch?v=vy56jzo9SqE.  You definitely need a guillotine here too.  My rotary cutter is OK for single sheets but anything more, it just can't cope.  I think the paper I used was a little too heavy.  Sheena suggests cartridge paper.  If you are making a special notebook, you could look for some really nice, even handmade papers.

The only thing I did differently was glue a piece of ribbon down the centre (about halfway down the spine) and then sewed the signatures through that as well.  When I get chance I shall get some metal charms and attach them to the bottom of the piece of ribbon.  Next I'm going to try something a bit bigger.  Sheena made a cover for her tablet. I'm thinking of using it to cover one of my jewellery boxes.  I am definitely going to make more notebooks though. I think they will make cool gifts for people.  Well done Sheena for another fab idea!

Well better finish here.  Need to tidy up a bit - it's like a bomb has hit!  Have a good crafty week.